
Setup, Customize, and Manage Communities
Communities is an interactive, centralized platform that combines various educational resources, allowing members to create, connect, and engage in groups based on specific interests. It facilitates interactive discussions and knowledge sharing among members by offering features such as domain setup, group creation, customization, and user management. This versatile platform effectively blends learning, networking, and community building into a seamless user experience.
Until this has complete Beta, Communities may be enabled under Labs. Go to Settings >> Labs
What is the Communities feature?
The Communities feature is a comprehensive tool provided by the CRM platform that enables the creation and management of online communities. It is a hub for discussion, learning, networking, and knowledge-sharing.
Key Components of the Communities Feature:

Group Creation:Users can create multiple groups based on specific interests, topics, or industries. These groups serve as sub-communities where members can engage in focused discussions, share insights, and collaborate on projects.
Domain Setup:The platform allows users to set up their custom domain or use a pre-configured subdomain, providing a personalized experience for community members.
Community Customization:Users can customize their communities, including group name, description, URL, branding (colors, logos, cover images), and promotional links. This allows users to create a unique and branded experience for their community members.
Group Management:The person who creates a group becomes the owner and assumes administrative responsibilities and privileges. This feature offers different roles for group management, including admins, moderators, and members, each with its permissions and responsibilities.
Membership Management:Potential members can join a group by creating a community profile and signing up via the group's unique URL. Once they sign up, they can participate in any available community groups.
Learning and Networking Opportunities:The communities provide a platform for users to learn from various courses, participate in discussions and events, vote in polls, and connect with like-minded individuals.
Usage Cases:
E-Learning Platforms:An organization offering various online courses could use the Communities feature to set up different groups for each course or subject. This allows learners to engage in focused discussions, share insights, ask questions, and collaborate on projects pertaining to their course. Instructors can share resources, answer questions, and facilitate discussions.
Corporate Communication:The Communities feature could allow various departments to collaborate in a large corporation. Each department could have its group, enabling focused discussions, announcements, document sharing, and project collaboration. It could also be used for company-wide announcements and discussions.
Product Development: Tech companies could use Communities to set up groups for beta testers of their new products. These users can share their feedback, report bugs, and suggest improvements, while the company can provide updates, answer questions, and gather valuable user insight for product enhancement.
Customer Support:Companies can create a community where customers can join groups based on their product or service. Within these groups, customers can ask questions, share tips and tricks, and provide product feedback. On the other hand, companies can offer support, share product updates, and engage with their user base.
Professional Associations:Associations or clubs could use the Communities feature to engage their members. They could have different groups for various activities or interests, allowing members to join the ones they are interested in. These groups can be used for sharing information, planning events, and having discussions.
Marketing Agencies:Agencies could set up communities for their clients, with separate groups for different services or campaigns. This allows for efficient coordination and communication about project updates, performance metrics, and other relevant discussions.
How to set up and configure the Communities feature in your sub-account?
Step 1: Setting up your Communities Domain
Please Note:
If you have already configured a domain for your ClientPortal, you will not need to do so again for your Communities portal as Communities uses the same domain as the Client Portal.
To configure your domain for communities, follow these steps:
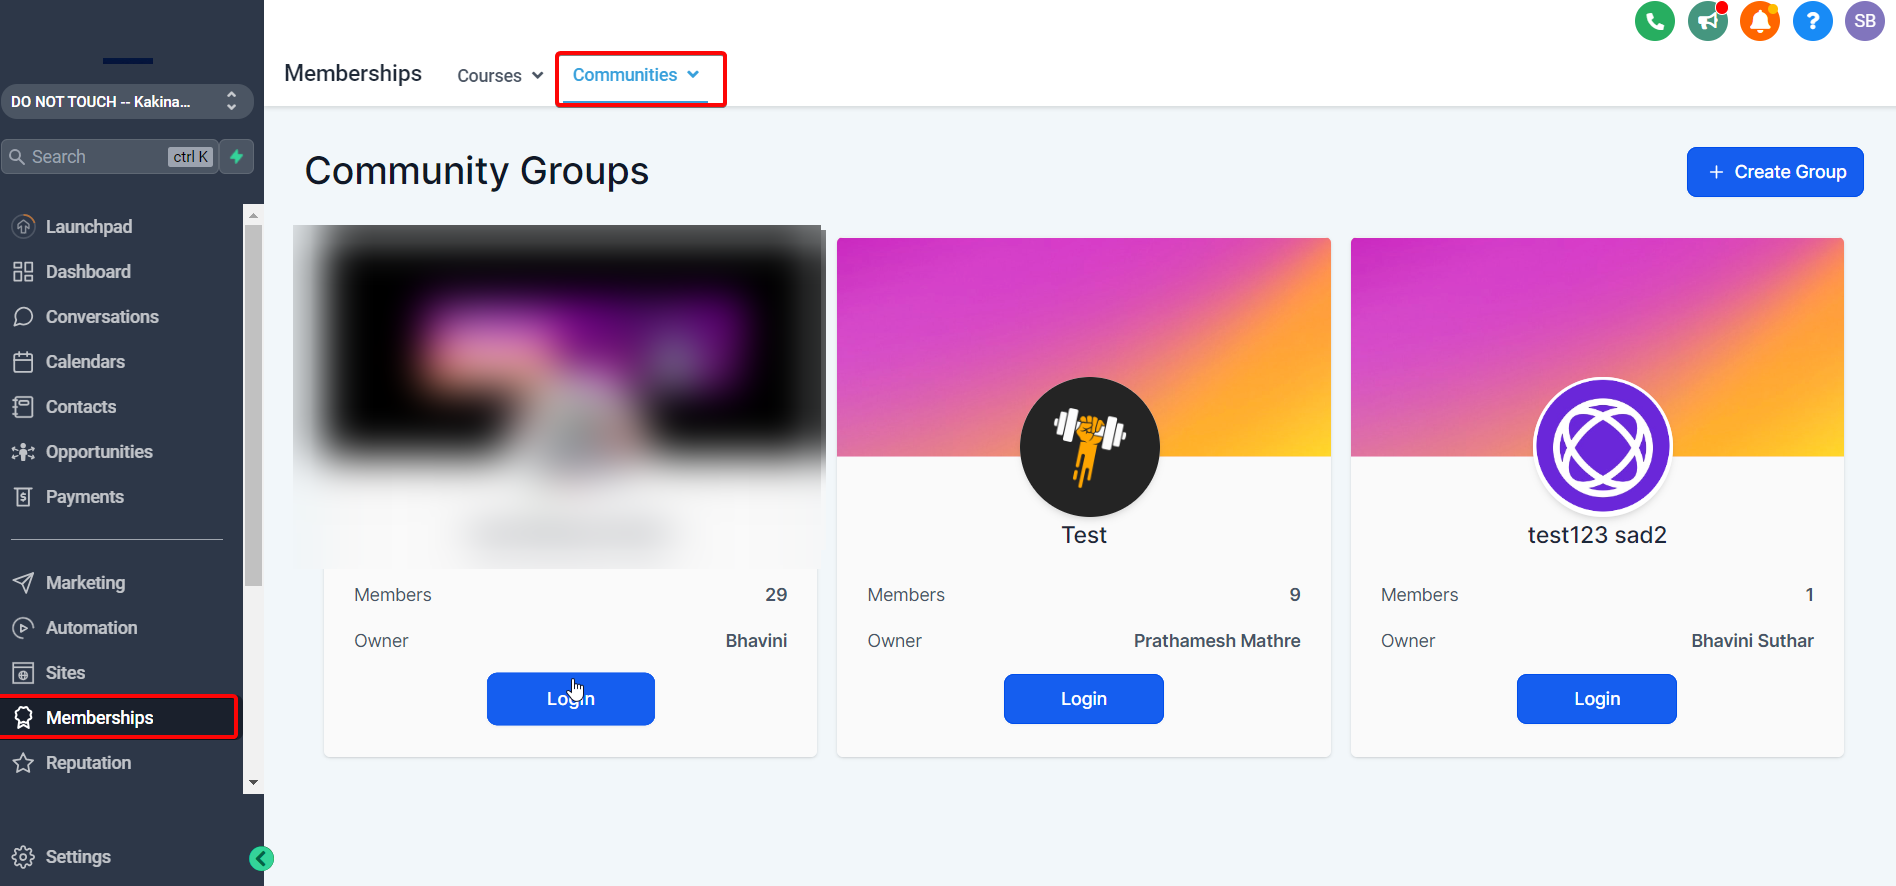
Start by accessing the "Communities" section within theMemberships area in the sidebar.
Head toSettings
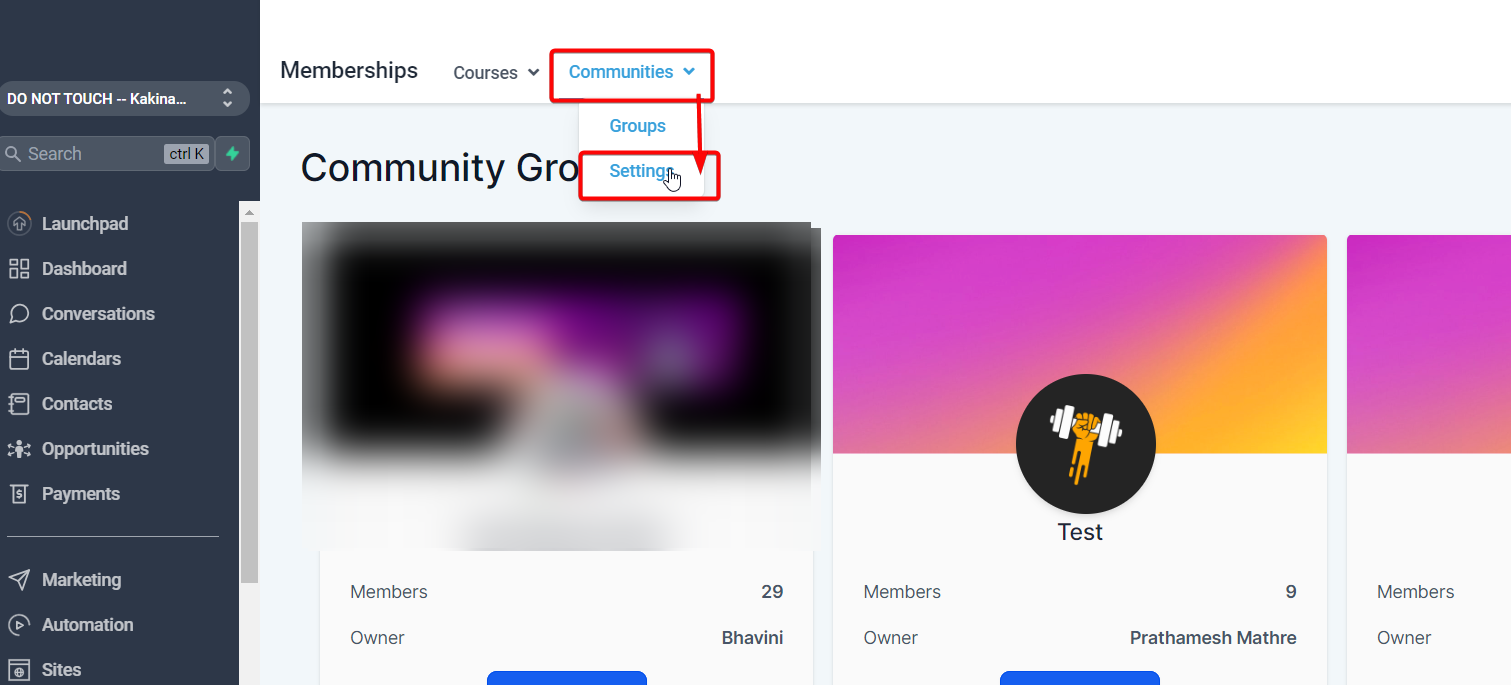
It will automatically navigate you to Client Portal's Domain Settings, as both features use the same domain.
Please Note:
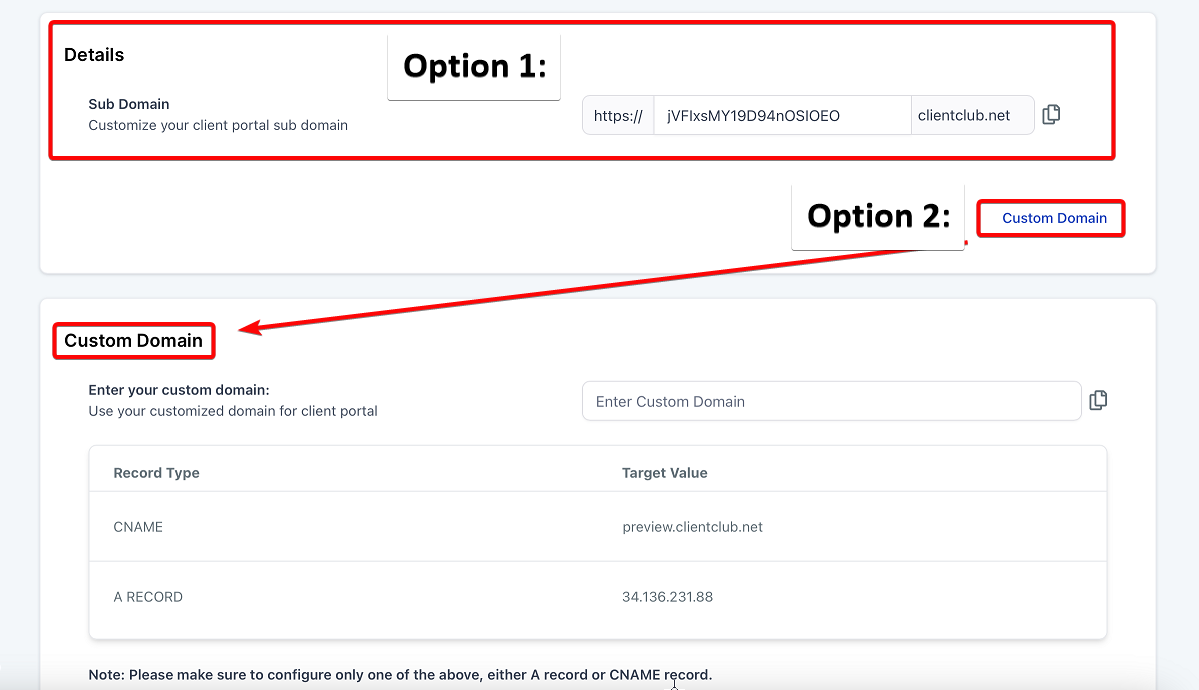
At this point, you have two options available to you:

Option 1: Utilize a pre-configured subdomain under "clientclub.net". This subdomain is already set up and ready to be used immediately. Simply select this option if it suits your needs. You will still need to scroll down and hit Update Domain to get this to work.

Option 2: Set up your own custom domain. If you prefer to use a domain that you own, follow the next steps.
To configure a custom domain for your client portal, follow these steps:
-
Using the left sidebar, navigate to theSites tab then theClient Portalsection. Proceed to the"Domain Setup." area.

-
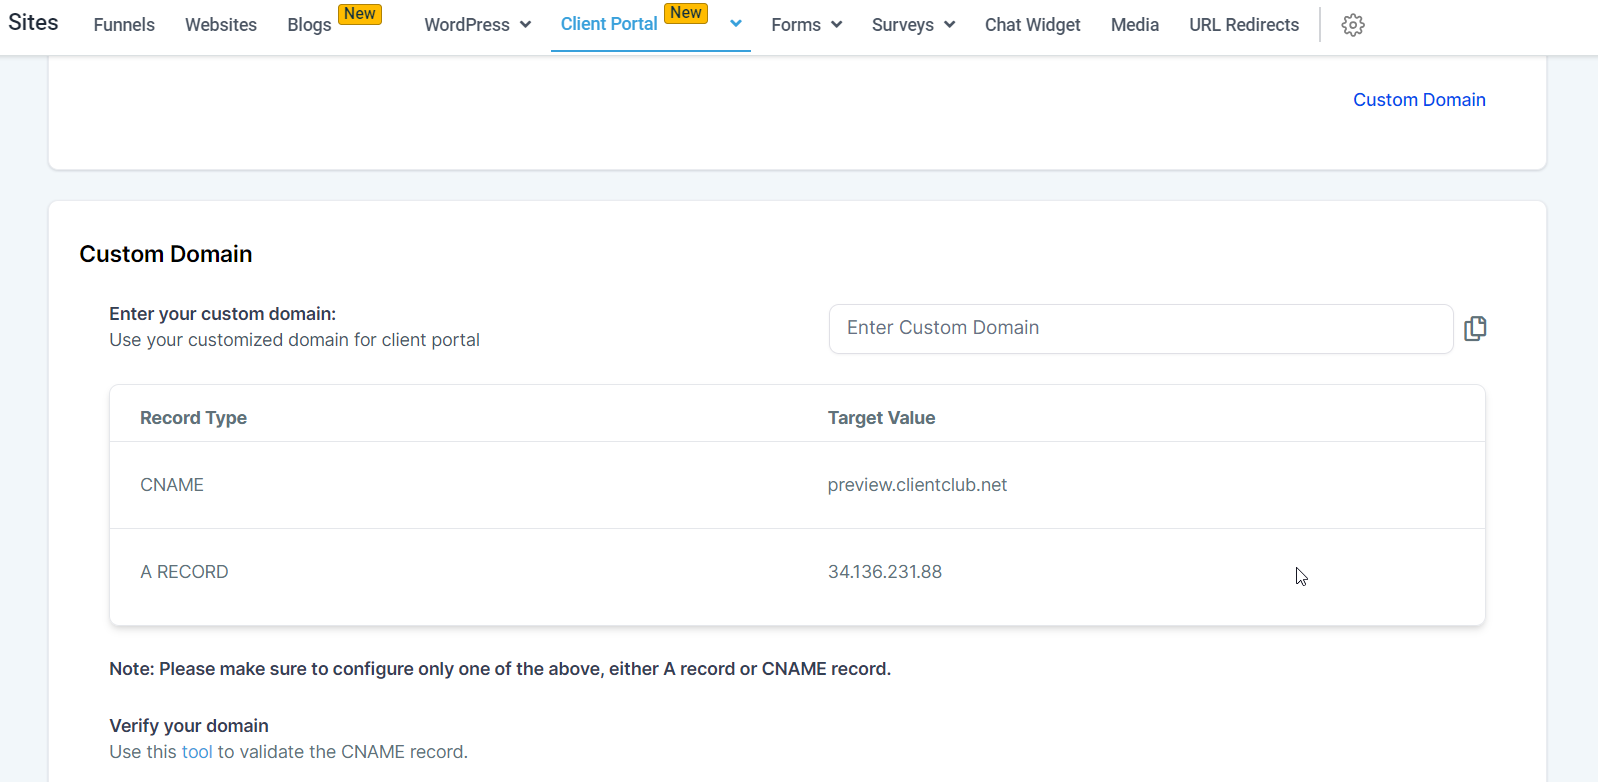
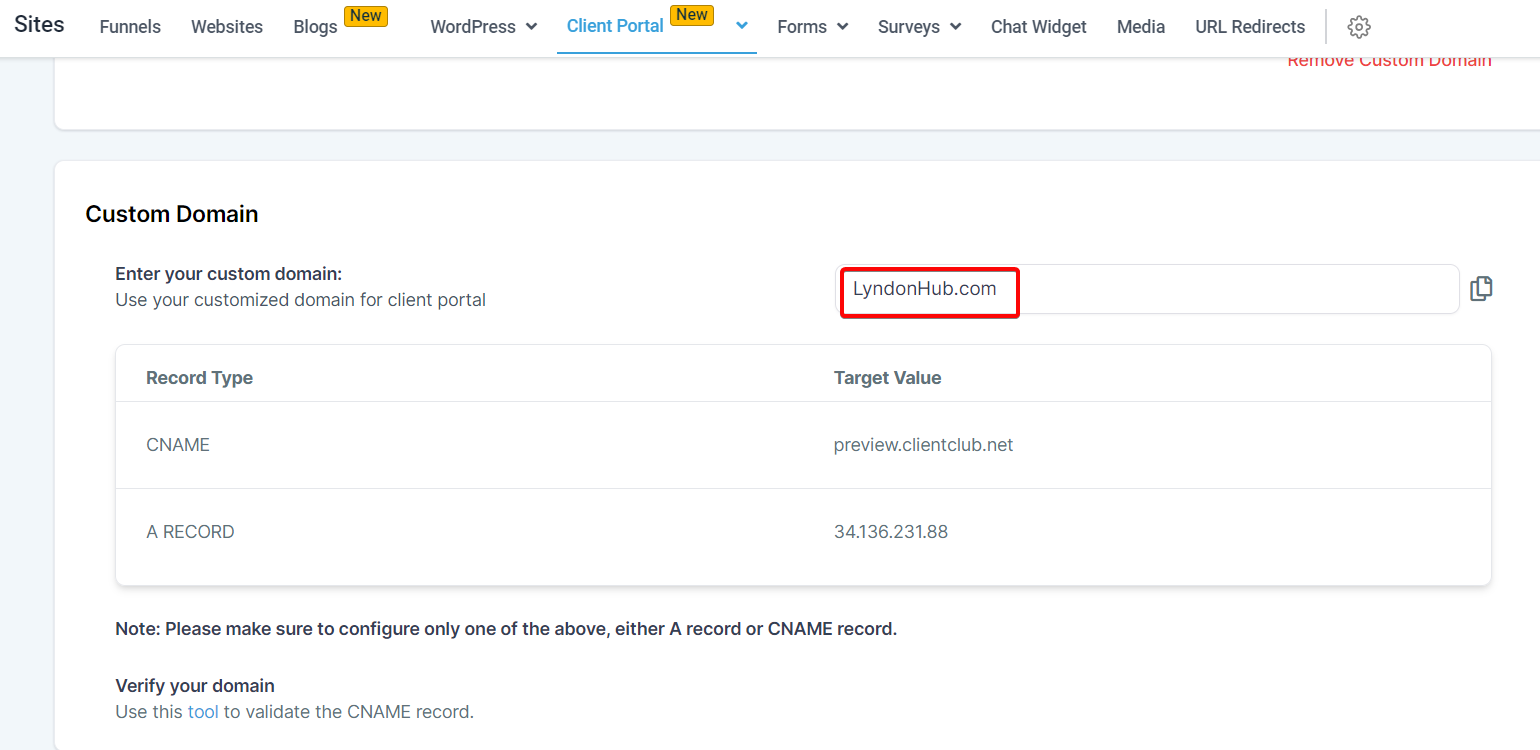
Click on the option for a Custom domain and input your desired domain name.

Before you can successfully set up an A or CNAME record, you must ensure that you have already configured your domain registrar to point to the specific IP address or server provided to you. This is an essential step in ensuring that your domain correctly refers to your server, enabling it to function properly.
A Record, also known as an Address Record, maps your domain to an individual server IP address. On the other hand, a CNAME record, or Canonical Name record, is used to map your domain (or subdomain) to another domain name.
Here's a step-by-step guide on how to add A records and CNAME records:
- Login to your Domain Registrar's dashboard.
- Navigate to the DNS settings.
- Here, you will find an option to add a new record.
- Select the type of record you want to add (A or CNAME).
- Enter the details - for an A record, this would be the IP address 34.136.231.88
- ; for a CNAME record, this would be the target domain preview.clientclub.net
- Save your changes.
Different registrars might have slight variations in the procedure, so here are some specific guides for popular registrars:
Please note:
It's important to replace the "designated IP address or server" placeholder with your actual IP address or server information in the record. Make sure to fill out this field accurately, as it's essential to correctly configure your domain settings.
Once you have entered the DNS records in your Domain registrar, give it a reasonable time to propagate them (depending on your domain registrar), and hitUpdate Domain.

Please note:
While the following resources provide a good general overview, the exact time of DNS propagation can vary due to several factors, such as the TTL set for the DNS record, your ISP's update frequency, and geographical factors. Typically, it is suggested to allow between 24 to 48 hours for DNS propagation.

Siteground: "Understand DNS Propagation & Why it Takes so Long"
GoDaddy: "What factors affect DNS propagation time? | Domains"
HostGator: "Propagation Times | HostGator Support"
DomainKing.NG: "DNS Propagation – how long does it take?"
AccuWeb Hosting: "How long Nameservers propagation could take after ..."
Namecheap: "DNS Propagation – Explained - Domains"
Webcentral: "What is the standard DNS propagation period?"
Step 2: Setting up Groups
After setting up your domain, You will have the ability to create groups within a community. Please note that the domain setup process is separate from creating community groups.
In the context of communities, groups refer to smaller spaces under a subdomain.
Each subaccount can create multiple groups, allowing for more focused discussions and collaboration within specific areas of interest.
To initiate the creation of a group, access the"Communities"section of the platform. Head to "Groups".
Locate and click the"Create Group"option.
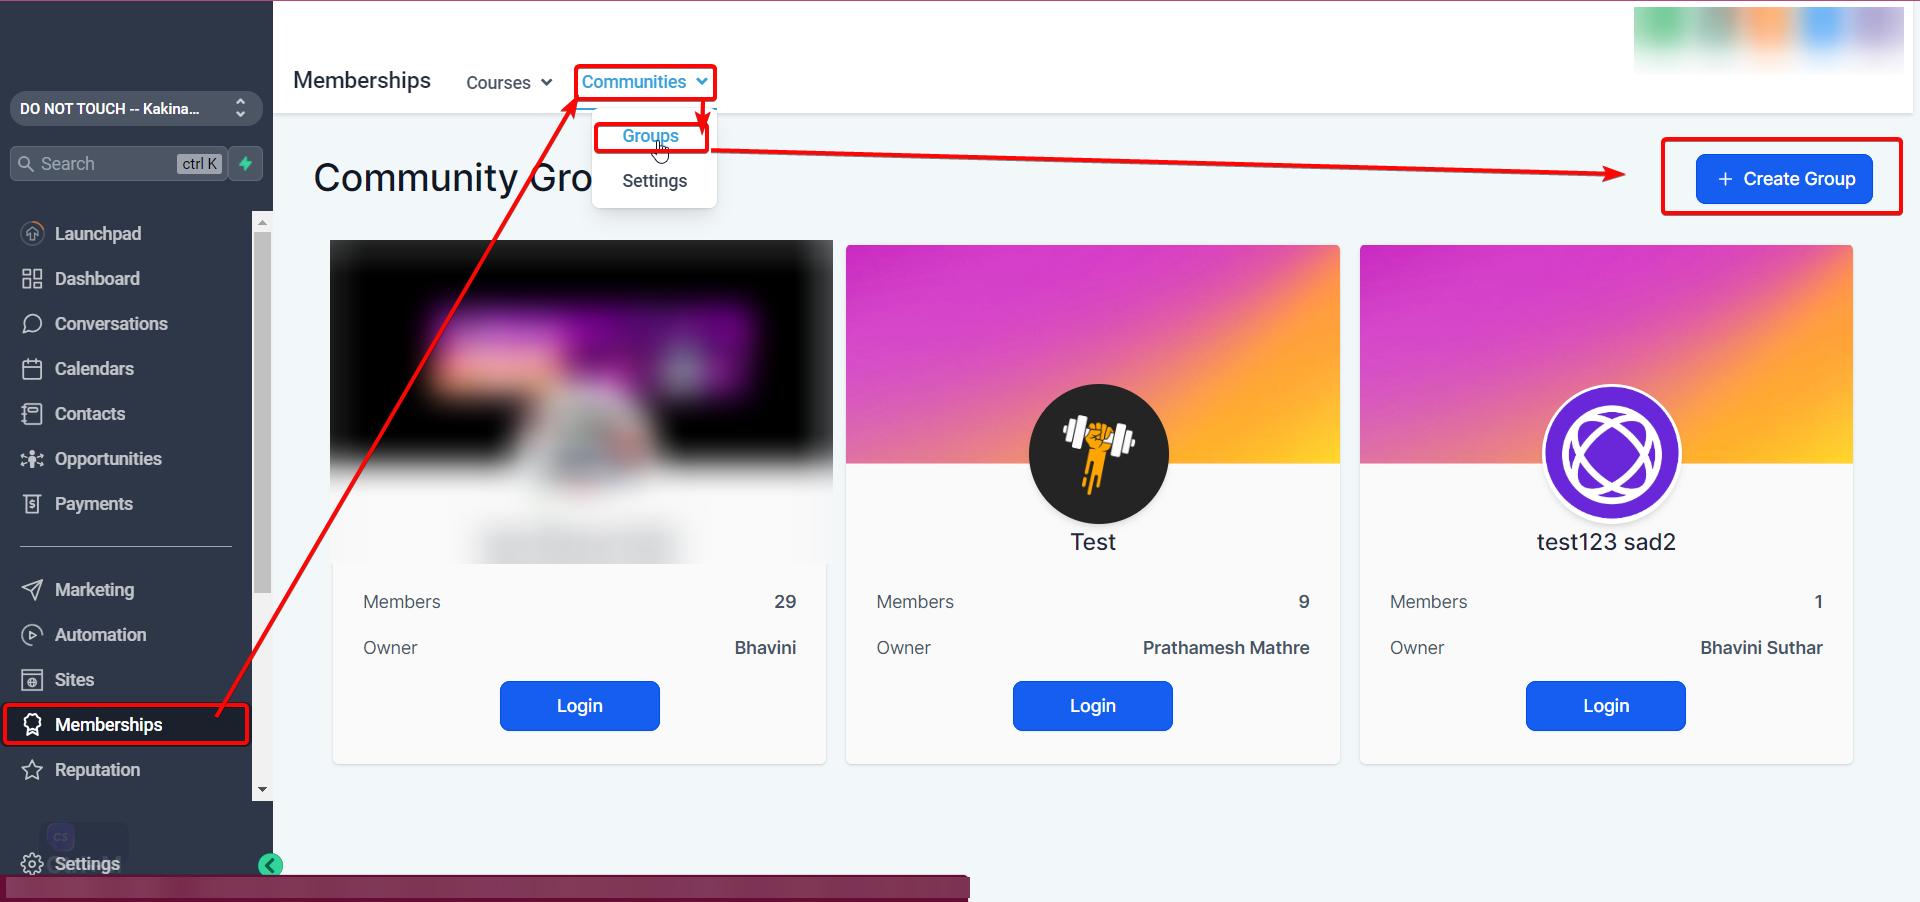
Here, you will be presented with a form or settings page to fill in the necessary details for your group.


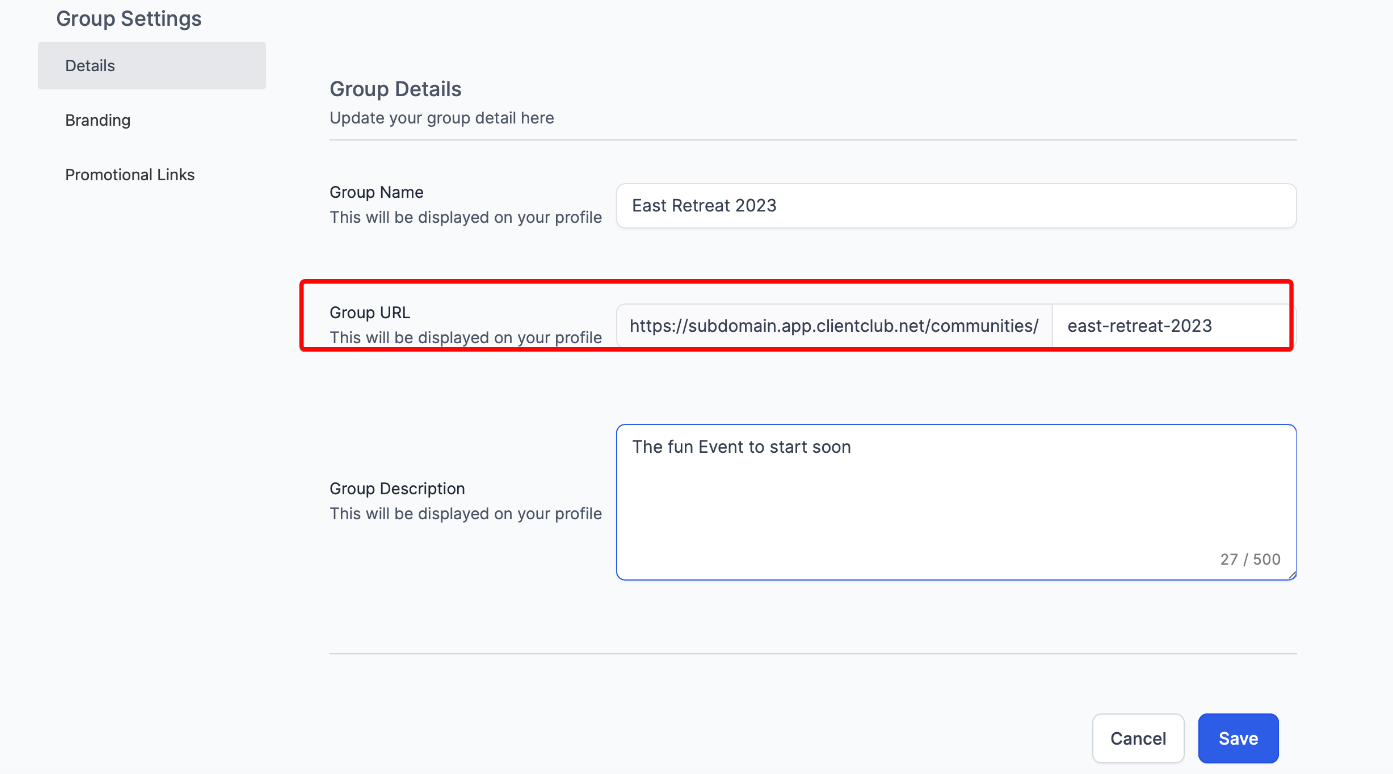
Group Name:This field is where you provide a unique name for your group, which will serve as the main identifier for your community. This should be related to the group's purpose or topic. For example, if you're creating a group about digital marketing, you might name it "Digital Marketing Enthusiasts."
Group URL (Group Slug):This is the unique web address where your group will be located. It should be easy to remember and share. Typically, it might be a simplified or abbreviated version of your group name, such as "digital-marketing" if your group name is "Digital Marketing Enthusiasts."
Group Description:This section should briefly outline what your group is about, the kind of discussions that will take place, and what members can expect from being a part of the group. For instance, you might describe the Digital Marketing Enthusiasts group as "A community for digital marketing professionals and enthusiasts to share strategies, tools, and trends in the industry."
Brand Color:Choose a color that represents your group or your brand. This color will be used in various aspects of your group's design to provide a consistent look and feel.
Favicon:This small icon will appear in the browser tab when someone is viewing your group. Ideally, It should be a small version of your logo or a symbol representing your group.
Cover Image:The main image will appear at the top of your group's page. It should be visually appealing and relevant to your group's topic. The recommended aspect ratio is 16:9, and the image should be clear at a resolution of 200x200 pixels.
Logo:This is the main logo for your group, which will appear in various places, such as the group switcher. It should ideally be square, with a 1:1 aspect ratio, and clear at a resolution of 200x200 pixels.
Once you have filled in the required details, create the group using the provided options or buttons.

Please Note:
The individual who initiates the group creation process automatically becomes the owner of that group, assuming administrative responsibilities and privileges within the group.
Step 3: How do members get added to the group?
To allow members to join your group, they must sign up using the group's unique URL and create a community profile. It's important to note that the community profile will be shared across all groups within the same community. Here's a rephrased version of the process:
Send an email or SMS to potential members, providing them with the group's URL and inviting them to join.

Members can click on the provided URL, leading them to a page where they can join the group.
Upon clicking "Join Group," they will be prompted to sign up for the client portal.

Once they sign up or log in, they gain access to the client portal and can choose to participate in any of the available groups within the community.
Members can join multiple groups within the community based on their interests or preferences.
Step 4: Customizing your Groups
You can personalize and customize your community groups according to your preferences. By default, a group will have the customizations you gave in Step 2. Here are multiple options available for customization:
Details:
Group Name and Description:
You can choose a suitable name for your group that aligns with its purpose.
Add a descriptive group description to provide information and context to potential members.

Group URL:
Customize the group's URL to make it more relevant or memorable for your audience.
Each Community Group is initially assigned a default URL, but you can personalize it according to your preferences.
Please Note:
You can only modify the group URL once, so it's crucial to double-check your desired URL before saving the changes.
- Access the group settings by clicking on the settings icon at the top of the page.
- In the left menu, locate and click on the "Details" section.
- You will find the option to change the group URL within the Details section.
- Once you have made the necessary adjustments, save the changes.
- Congratulations! Your group now has a customized URL. To confirm the update, you can revisit the settings modal and ensure that your current URL reflects the newly set one.
By following these steps, you can customize your Community group's URL. Please remember to review your changes before finalizing them, as there is a one-time limitation on modifying the group URL.
Branding:
Select a primary color that represents your brand identity. This color will be reflected throughout your group, creating a cohesive visual experience.
Upload a group logo in the group switcher, allowing members to identify and navigate to your group easily.
Add a cover image to personalize the group's appearance and showcase relevant visuals or branding elements.
Include a favicon, a small icon displayed in the browser tab, to further enhance your group's branding.

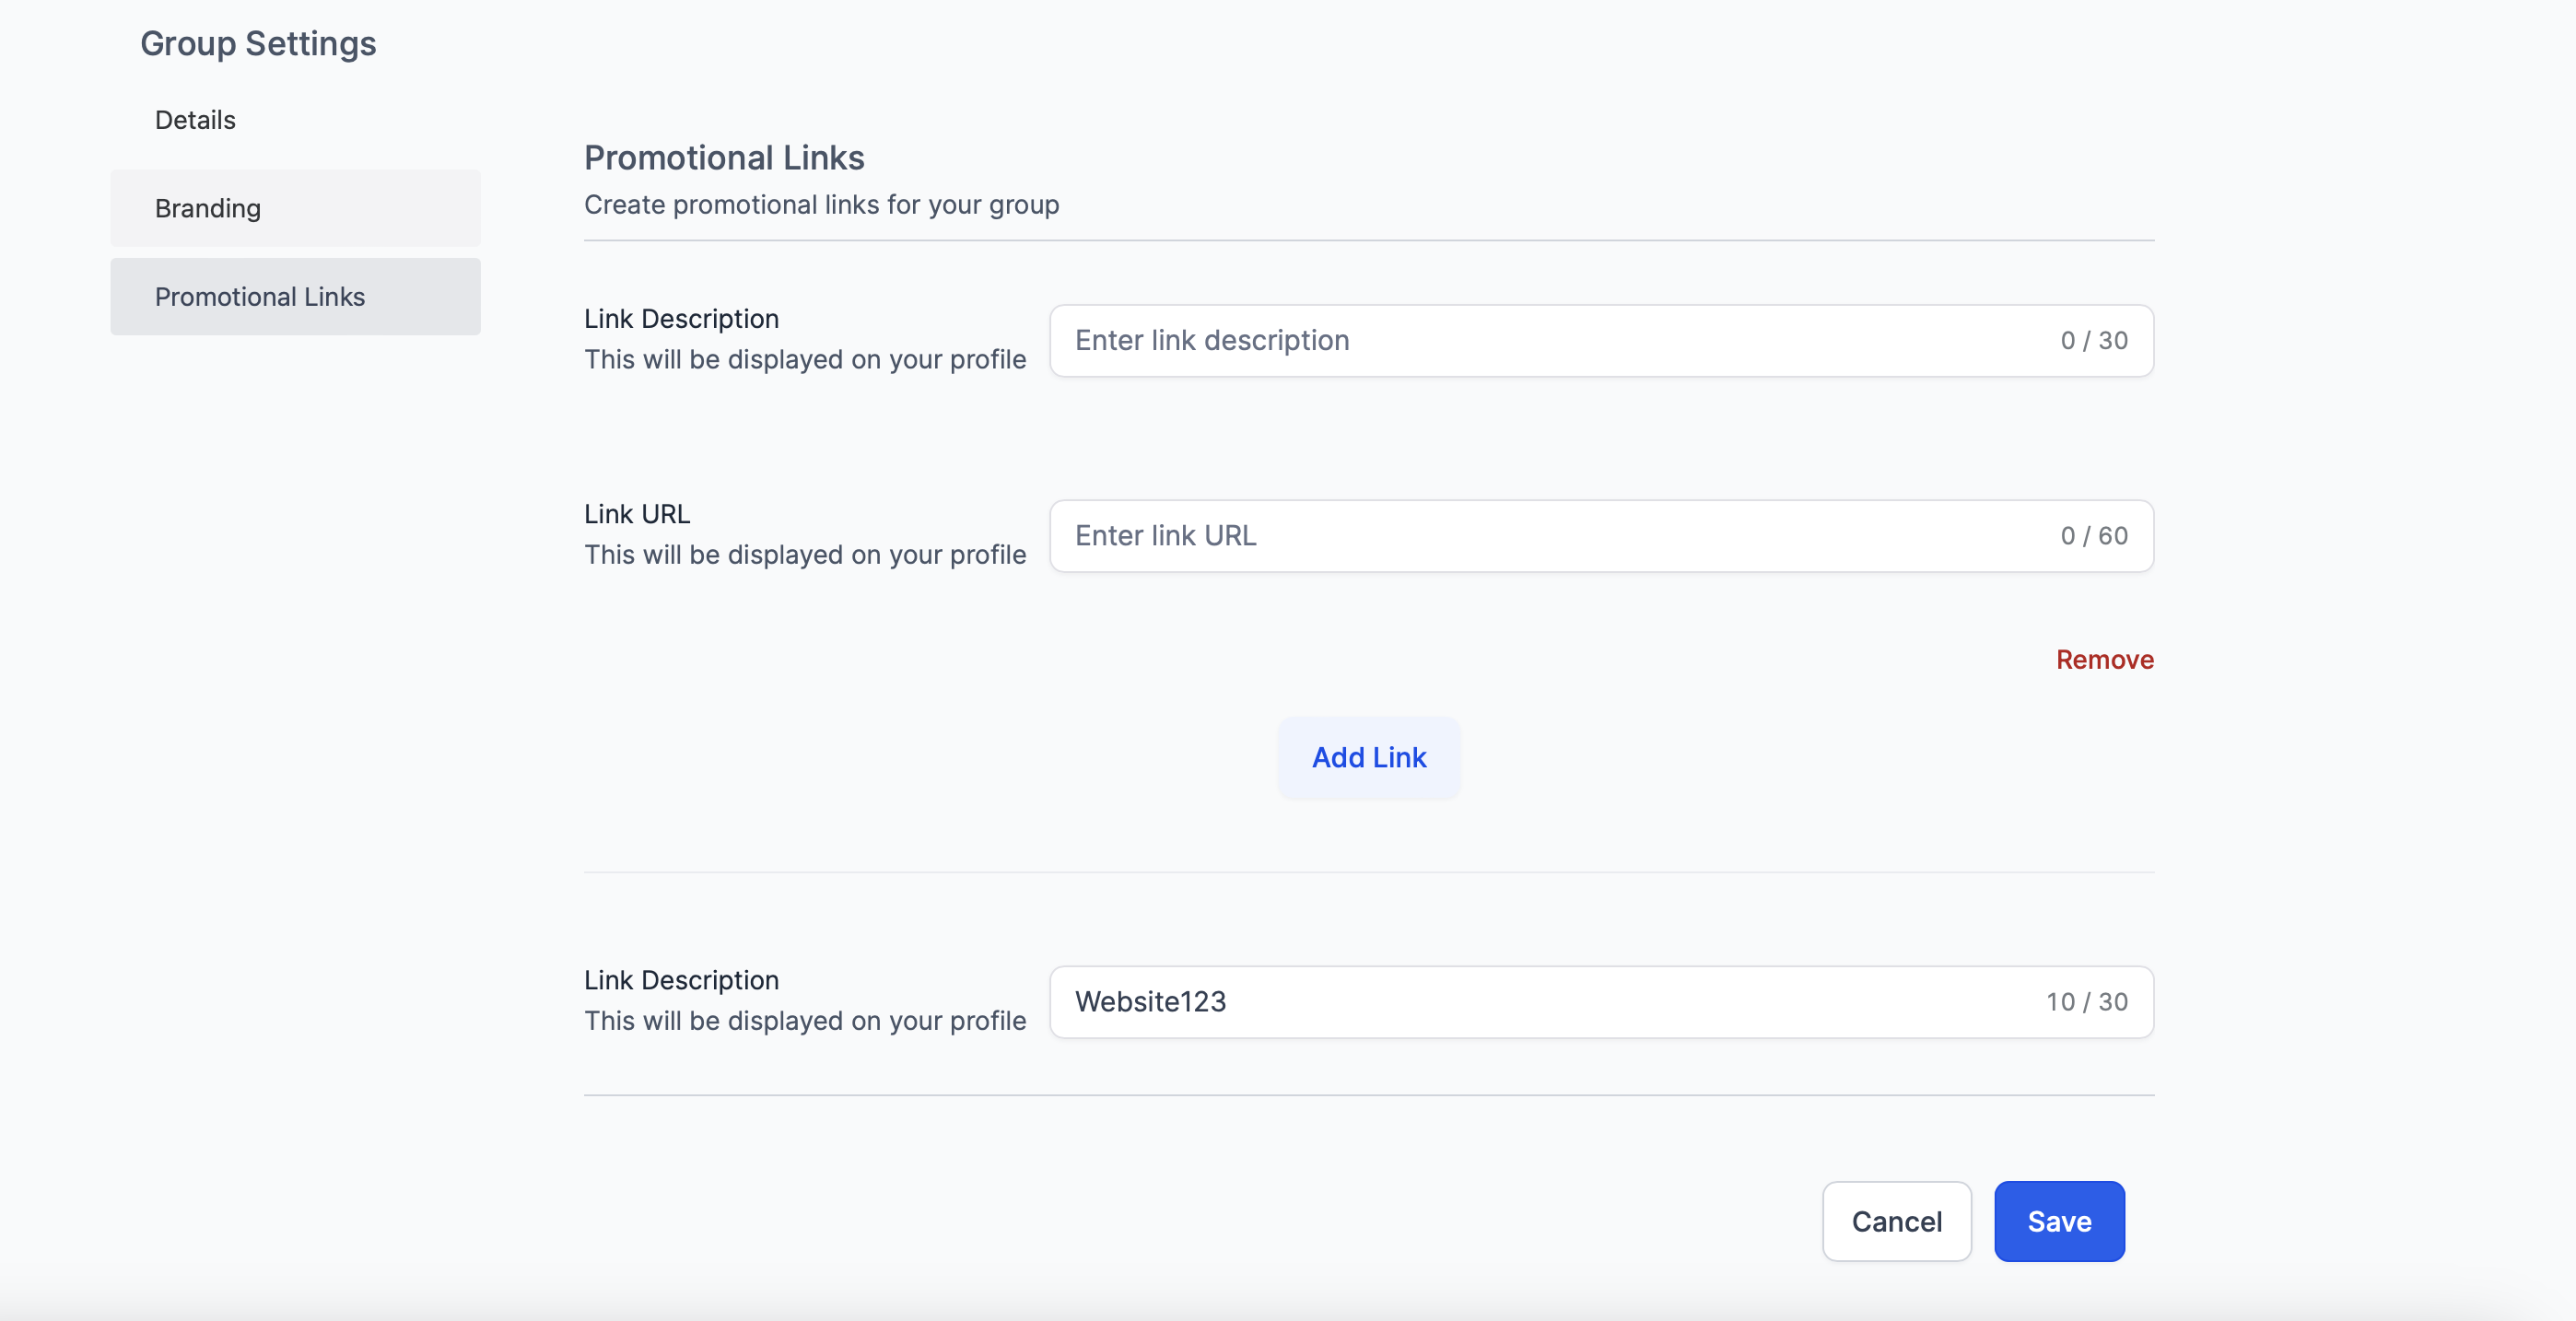
Promotional Links:
Integrate promotional links within your group by adding a title and corresponding link.
These links will be visible to members of your community group, allowing you to share relevant resources, announcements, or external content.
By leveraging these customization options, you can tailor your community group to create a unique and branded experience for your members.
Step 5: Sub Account Users Inside community groups
- Users automatically become the group's owner when they create a group. It's important to note that group ownership cannot be transferred to another user.
- Admins gain admin privileges automatically when they log into the community from the platform.
- Conversely, Admin users become group moderators when they log in from the builder platform.
- This distinction in roles allows for effective management and moderation of the group, ensuring that admins and moderators have the necessary permissions and responsibilities based on their user type and platform access.
- Admins may participate in and manage the community groups within the platform.
FAQs
Q: Can I integrate my existing website with my Communities platform?
A: While you can't directly integrate your existing website with the Communities platform, you can link the two. You can share links to your Community groups on your website and vice versa, enabling easy user navigation.
Q: Is there a limit to the number of groups I can create within my Community?
A: At this time, there are no limits on the number of groups or users within groups in a Community. But that will change down the line. Stay tuned.
Q: What happens if I change the URL of my community group?
A: Changing the URL of your community group will affect the accessibility of your group. All previous links shared with the old URL will no longer work, and users must use the new URL to access the group.
Q: Can I monitor the activities within my community groups?
A: As an admin or group owner, you can monitor the activities within your community groups. You can view discussions, manage members, and even intervene when necessary to ensure a healthy and productive community environment.
Q: How can I promote active engagement in my community groups?
A: There are several ways to promote active engagement in your community groups. You can regularly share interesting content, ask thought-provoking questions, hold events or competitions, and encourage members to share their thoughts and ideas.